
Introduction
There was a time, before Google Analytics and before product dashboards, when almost every website proudly displayed a small counter at the bottom of the page: “You are visitor number 12,345”. Those old-school counters did not track people, did not profile audiences, and did not send data to third parties. They only counted impressions and displayed an honest number.
This guide explains how to recreate that idea for a modern blog deployed on Cloudflare: a per-article impression or view counter, persisted in a database, without a separate server, effectively at no cost and without sacrificing reader privacy.
Storage will be Cloudflare D1, a managed SQLite database that runs at the edge and connects to your Worker through a binding. D1 was chosen instead of KV because KV has no atomic increment, so under concurrent traffic it would lose counts. D1 performs count = count + 1 atomically in a single SQL statement.
The guide covers two implementations of the same pattern:
- Astro (specifically an AstroPaper-style blog) with the
@astrojs/cloudflareadapter andoutput: 'server'. - SvelteKit with the
@sveltejs/adapter-cloudflareadapter, also running in SSR.
In both cases, the result has these properties:
- The counter lives in a project-owned endpoint; there is no separate server or deployment.
- The site does not need additional SSR: if you already run with a Cloudflare adapter, the endpoint reuses that same Worker.
- The user is not tracked, and there are no third-party cookies or persistent IDs; only one impression is counted.
- The increment is atomic, so the count is not corrupted under concurrency.
- For a personal blog, the cost is effectively zero.
Table of contents
Table of contents
- General architecture
- Prerequisites
- Does it cost anything?
- Create the D1 database
- Part 1: Astro (AstroPaper) in SSR with the Cloudflare adapter
- Part 2: SvelteKit with the Cloudflare adapter in SSR
- Optional visual customization
- Optional variant: do not count reloads from the same visitor
- Basic hardening
- Troubleshooting
- Conclusion
- Appendix: Cloudflare API token permissions
- References
General architecture
The pattern is identical in both frameworks. Only the way the framework exposes the D1 binding to the endpoint code changes.
flowchart LR
    READER["Reader browser"] -->|"POST /api/views/:slug"| WORKER["Worker at the edge (Astro or SvelteKit with Cloudflare adapter)"]
    WORKER -->|"DB binding"| D1[("Cloudflare D1 SQLite")]
    D1 -->|"updated count"| WORKER
    WORKER -->|"JSON { count }"| READER
    READER -->|"render"| DOM["12,345 views"]
The flow on each article load:
- The page renders normally (static or SSR, it does not matter).
- A small client-side script sends
POST /api/views/<slug>on load. - The endpoint, inside the same Worker, runs an atomic
UPSERTin D1 and returns the new total. - The script writes the number into the DOM.
Prerequisites
Use this checklist before implementing:
- You have a blog deployed on Cloudflare Workers (or Pages) with Astro
@astrojs/cloudflare, or with SvelteKit +@sveltejs/adapter-cloudflare. - [ ] You have Wrangler installed and authenticated (npx wrangler login).
- Your project already deploys correctly before adding the counter. - [ ]
You know the slug or unique identifier of each article, available at
render time (frontmatter, route parameter, etc.). - [ ] You accept that the
initial count starts at zero; there is no historical data to import (if you
have any, you can preload it with an
INSERT). - [ ] You agree to count impressions, not unique users, unless you apply the optional deduplication described below.
Does it cost anything?
For a personal blog, no. Cloudflare’s free-plan limits are far above what a visit counter consumes:
| Resource | Free-plan limit | What the counter consumes |
|---|---|---|
| Workers / invocations | 100,000 requests/day | 1 POST per article load |
| D1 row reads | 5,000,000 rows read/day | 1 row per impression |
| D1 row writes | 100,000 rows written/day | 1 row per impression |
| D1 storage | 5 GB | one tiny row per article |
A single row per article (slug + integer) weighs bytes. Even a blog with tens of thousands of daily visits remains comfortably within the free plan. If you ever exceed it, D1’s paid plan charges for rows read/written and GB-months, in cent-level amounts for this use case.
Create the D1 database
This step is identical for Astro and SvelteKit. The table is the same.
Create the database:
npx wrangler d1 create viewsWrangler prints a block containing the database_id. Save it; you will need it in wrangler.jsonc.
Create the table. It is best to keep it in a versioned schema file:
CREATE TABLE IF NOT EXISTS views ( slug TEXT PRIMARY KEY, count INTEGER NOT NULL DEFAULT 0);Apply it first remotely (the real database used by your deployed Worker):
npx wrangler d1 execute views --remote --file=./schema.sqlAnd, if you develop locally with wrangler dev, also apply it to the local copy:
npx wrangler d1 execute views --local --file=./schema.sqlPart 1: Astro (AstroPaper) in SSR with the Cloudflare adapter
This part assumes an AstroPaper-style blog with output: 'server' and adapter: cloudflare().
Declare the D1 binding in wrangler
Add the DB binding to your wrangler.jsonc (alongside assets, compatibility_date, etc.):
{ "name": "my-blog", "compatibility_date": "2026-03-06", "compatibility_flags": ["nodejs_compat"], "assets": { "binding": "ASSETS", "directory": "./dist", }, // [!code ++] "d1_databases": [ // [!code ++] { // [!code ++] "binding": "DB", // [!code ++] "database_name": "views", // [!code ++] "database_id": "PASTE-THE-DATABASE-ID-HERE", // [!code ++] }, // [!code ++] ],}Type the binding for TypeScript
In Astro 6 (@astrojs/cloudflare adapter 13.x), generate the types from the bindings declared in wrangler.jsonc:
npx wrangler typesThis creates a worker-configuration.d.ts file with the global Env interface (which already includes your DB) and the definitions for the cloudflare:workers module. Your tsconfig.json picks up the file through the usual include pattern.
The counter endpoint
Create src/pages/api/views/[slug].ts. A single POST increments and returns the total:
import type { APIRoute } from "astro";import { env } from "cloudflare:workers";
// The site can be static; this endpoint must be dynamic.export const prerender = false;
export const POST: APIRoute = async ({ params }) => {  const slug = params.slug;  if (!slug) {    return new Response("Missing slug", { status: 400 });  }
  const db = env.DB;
  // Atomic UPSERT: insert with 1, or add 1 if it already exists.  await db    .prepare(      "INSERT INTO views (slug, count) VALUES (?, 1) " +        "ON CONFLICT(slug) DO UPDATE SET count = count + 1"    )    .bind(slug)    .run();
  const row = await db    .prepare("SELECT count FROM views WHERE slug = ?")    .bind(slug)    .first<{ count: number }>();
  return Response.json({ count: row?.count ?? 0 });};
// Optional: read without incrementing (e.g. for a stats page).export const GET: APIRoute = async ({ params }) => {  const slug = params.slug;  if (!slug) return new Response("Missing slug", { status: 400 });
  const row = await env.DB.prepare("SELECT count FROM views WHERE slug = ?")    .bind(slug)    .first<{ count: number }>();
  return Response.json({ count: row?.count ?? 0 });};
The visual component
Create a reusable src/components/ViewCounter.astro component that receives the slug and renders the number:
---interface Props {  slug: string;}const { slug } = Astro.props;---
<span class="view-counter" aria-live="polite">  <span id="view-count" data-slug={slug}>…</span> views</span>
<script> function loadViewCount() { const el = document.getElementById("view-count"); if (!el) return; const slug = el.dataset.slug; fetch(`/api/views/${slug}`, { method: "POST" }) .then(r => r.json() as Promise<{ count: number }>) .then(d => { el.textContent = new Intl.NumberFormat().format(d.count); }) .catch(() => { el.textContent = "—"; }); } // astro:page-load runs on the initial load and after every ClientRouter navigation. document.addEventListener("astro:page-load", loadViewCount);</script>Use it in the article layout (in AstroPaper, typically src/layouts/PostDetails.astro or equivalent), passing the post slug:
---import ViewCounter from "@/components/ViewCounter.astro";// `post` is the article entry in your layout.---
<ViewCounter slug={post.id} />Part 2: SvelteKit with the Cloudflare adapter in SSR
The pattern is the same; the framework mechanics change. SvelteKit exposes Cloudflare bindings through event.platform.env.
Adapter and binding
Make sure you use @sveltejs/adapter-cloudflare in svelte.config.js:
import adapter from "@sveltejs/adapter-cloudflare";import { vitePreprocess } from "@sveltejs/vite-plugin-svelte";
export default {  preprocess: vitePreprocess(),  kit: {    adapter: adapter(),  },};
Declare the DB binding as before, in wrangler.jsonc:
{ "name": "my-sveltekit-blog", "compatibility_date": "2026-03-06", "compatibility_flags": ["nodejs_compat"], "d1_databases": [ { "binding": "DB", "database_name": "views", "database_id": "PASTE-THE-DATABASE-ID-HERE", }, ],}Type the platform
In SvelteKit, bindings live in App.Platform. Declare them in src/app.d.ts:
declare global {  namespace App {    interface Platform {      env: {        DB: D1Database;      };    }  }}
export {};The counter endpoint
Create src/routes/api/views/[slug]/+server.ts:
import { json, error } from "@sveltejs/kit";import type { RequestHandler } from "./$types";
export const POST: RequestHandler = async ({ params, platform }) => {  const db = platform?.env.DB;  if (!db) throw error(500, "D1 binding not available");
  const slug = params.slug;
  await db    .prepare(      "INSERT INTO views (slug, count) VALUES (?, 1) " +        "ON CONFLICT(slug) DO UPDATE SET count = count + 1"    )    .bind(slug)    .run();
  const row = await db    .prepare("SELECT count FROM views WHERE slug = ?")    .bind(slug)    .first<{ count: number }>();
  return json({ count: row?.count ?? 0 });};
export const GET: RequestHandler = async ({ params, platform }) => {  const db = platform?.env.DB;  if (!db) throw error(500, "D1 binding not available");
  const row = await db    .prepare("SELECT count FROM views WHERE slug = ?")    .bind(params.slug)    .first<{ count: number }>();
  return json({ count: row?.count ?? 0 });};
The visual component
Create src/lib/components/ViewCounter.svelte:
<script lang="ts">  import { onMount } from "svelte";
  export let slug: string;
  let count: number | null = null;
  onMount(async () => {    try {      const r = await fetch(`/api/views/${slug}`, { method: "POST" });      const d = (await r.json()) as { count: number };      count = d.count;    } catch {      count = null;    }  });</script>
<span aria-live="polite">  {count === null ? "—" : new Intl.NumberFormat().format(count)} views</span>
Use it in the article page (src/routes/blog/[slug]/+page.svelte or wherever you render the post):
<script lang="ts">  import ViewCounter from "$lib/components/ViewCounter.svelte";  export let data; // comes from your +page.ts / load</script>
<ViewCounter slug={data.post.slug} />Optional visual customization
The honest number is already enough, but part of the charm of old-school counters was their look: white digits on a black background, LED display style, or a mechanical tally-board style. There are two ways to get there.
Option A (recommended): LED style with CSS
Give the counter a digital-display look with a monospace font, dark background, and a subtle glow. The component does not change: only add styles. On the <span class="view-counter"> from the Astro component (or the <span> from the Svelte component), add:
.view-counter { display: inline-flex; align-items: center; gap: 0.35em; font-family: "Courier New", ui-monospace, monospace; font-weight: 700; letter-spacing: 0.08em; padding: 0.15em 0.5em; border-radius: 0.25em; background: #000; color: #00ff6a; /* classic phosphor green */ text-shadow: 0 0 6px #00ff6a; /* LED glow */}For the classic white on black look from the appendix, change color: #fff and remove or adjust the text-shadow.
Option A+: each digit in its own “slot”
The mechanical counter look (each digit in its own black box) requires wrapping each digit in its own element. Modify rendering to build a <span> per digit instead of writing the plain number. In the Astro component:
fetch(`/api/views/${slug}`, { method: "POST" }) .then(r => r.json() as Promise<{ count: number }>) .then(d => { const digits = new Intl.NumberFormat().format(d.count); el.textContent = ""; for (const ch of digits) { const span = document.createElement("span"); span.className = /\d/.test(ch) ? "digit" : "sep"; span.textContent = ch; el.appendChild(span); } });With its CSS:
.view-counter :global(.digit) { display: inline-block; min-width: 1ch; padding: 0.1em 0.25em; margin: 0 1px; text-align: center; background: #111; color: #fff; border-radius: 3px; box-shadow: inset 0 0 0 1px #333;}.view-counter :global(.sep) { /* thousands comma */ padding: 0 0.1em; color: #888;}Option B: images for the digits (the retro method)
This is the original nineties method: one image per digit (0.gif … 9.gif), or a single sprite with all ten digits, with the number composed by placing the correct image for each digit. It reproduces exact pixel art that CSS cannot always imitate, but at a cost:
- Each digit is an image: it does not scale crisply on high-density screens unless you prepare @2x versions.
- The number stops being selectable text; you must provide an
alt/aria-labelvalue to preserve accessibility. - It adds HTTP requests and sprites to maintain and preload.
If you still want it for aesthetic reasons, rendering places one <img> per digit:
fetch(`/api/views/${slug}`, { method: "POST" }) .then(r => r.json() as Promise<{ count: number }>) .then(d => { const n = String(d.count); // no separators, simpler el.textContent = ""; el.setAttribute("aria-label", `${n} views`); for (const ch of n) { const img = document.createElement("img"); img.src = `/counter/${ch}.gif`; // 0.gif … 9.gif in /public/counter/ img.alt = ""; // decorative; aria-label carries the value img.className = "digit-img"; el.appendChild(img); } });.view-counter :global(.digit-img) { height: 1.2em; width: auto; image-rendering: pixelated; /* keeps pixel-art edges crisp when scaled */ vertical-align: middle;}Place your 0.gif…9.gif files in public/counter/ (Astro) or static/counter/ (SvelteKit) so they are served as static assets.
Optional variant: do not count reloads from the same visitor
The base design counts every impression, including reloads. To get closer to “views” without tracking the user, mark in localStorage that this browser has already counted this article. It is purely local deduplication: no cookies, no IDs, and no data sent to third parties.
Replace the fetch call with:
const key = `viewed:${slug}`;if (!localStorage.getItem(key)) { localStorage.setItem(key, "1"); fetch(`/api/views/${slug}`, { method: "POST" }) .then(r => r.json()) .then(d => { /* render d.count */ });} else { // Already counted before: only read the total without incrementing. fetch(`/api/views/${slug}`) .then(r => r.json()) .then(d => { /* render d.count */ });}Basic hardening
Some optional measures, ordered by real usefulness for a blog:
- Filter obvious bots. Because the count is triggered by client-side JavaScript, most simple crawlers already do not activate it (they do not execute the script). For those that do, you can inspect
User-Agentin the endpoint and skip increments for known bot patterns. Do not expect perfection. - Validate the slug. Accept only slugs that really exist, so nobody can inflate junk rows with
POST /api/views/whatever. If you have a list of published slugs, reject requests not in it; or restrict the format with a simple regular expression. - Rate limiting. For deliberate abuse, Cloudflare offers rate limiting rules at the edge on the
/api/views/*route, without touching your code. - Reduce writes at scale. If the volume ever justifies it, deduplicate per client (previous section) or accumulate increments in memory/KV and flush them to D1 in batches. This is premature optimization for almost any blog; do not do it until measurements show it is needed.
Troubleshooting
The number appears as ”—” or does not change.
Open the browser console and the network tab. Verify that POST /api/views/<slug> responds 200 with { "count": N }. A 500 usually means the DB binding did not reach the endpoint.
env.DB is undefined (Astro) or platform is undefined (SvelteKit).
The binding is not connected. Check that d1_databases is in wrangler.jsonc with the correct database_id, that the binding name matches what your code uses (DB), that you redeployed, and —in development— that you are running with the Cloudflare adapter (not a dev command without platform emulation).
Property 'runtime' does not exist on type 'Locals' (Astro).
You are using the old Astro.locals.runtime.env pattern, removed in Astro 6. Import env from cloudflare:workers (see the endpoint) and generate the types with npx wrangler types.
no such table: views.
You did not apply the schema in the environment you are hitting. Remember that --local and --remote are different databases: run schema.sql in both as appropriate.
It works locally but not in production (or vice versa).
It is almost always the same --local vs --remote problem. The local database used by wrangler dev is not the database used by your deployed Worker.
The count increases by two.
In development, React Strict Mode (if you use it in Astro islands) or a double mount may trigger two fetch calls. It does not happen in production; if it bothers you in dev, use the localStorage variant.
Conclusion
Recreating the old-school visit counter on Cloudflare is surprisingly direct: one D1 table with one row per article, an endpoint that performs an atomic UPSERT, and a ten-line client script. No separate server is needed, you do not need to enable SSR just for this, and the cost is effectively zero.
The same pattern works for Astro and SvelteKit; the only thing that changes is how each framework gives you the D1 binding: import { env } from "cloudflare:workers" in Astro 6, platform.env in SvelteKit. The database logic —the SQL statement, the atomic increment, the total read— is exactly the same in both.
And, faithful to the original spirit, the counter counts impressions honestly without tracking anyone: a simple number at the bottom of the article, like in the old days.
Appendix: Cloudflare API token permissions
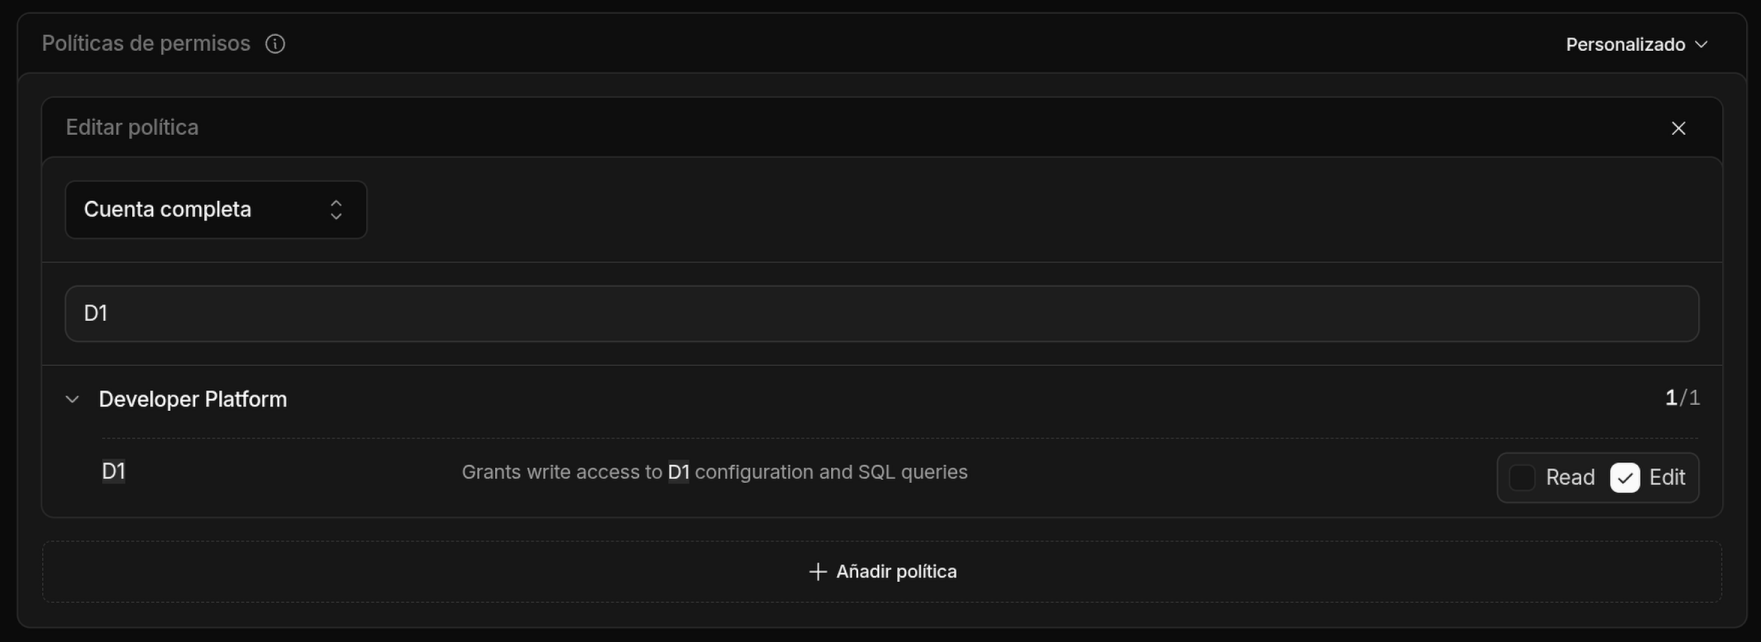
The operations in this guide —creating the D1 database and applying the schema with Wrangler— only touch D1. They do not need Workers, DNS, or any other account permissions.
If you use wrangler login (interactive OAuth flow), Wrangler obtains the permissions for you and you do not need to create a token. This appendix applies when you prefer an explicit API token, for example to run Wrangler in a non-interactive environment or with scoped credentials.
Minimum required permission
The operation is similar to the one described in this post about deploying SvelteKit on Cloudflare.
For D1, the minimum permission is:
| Guide operation | Command | Required permission |
|---|---|---|
| Create the database | wrangler d1 create views | Account → D1 → Edit |
| Apply the schema (remote) | wrangler d1 execute views --remote --file=./schema.sql | Account → D1 → Edit |
| Preload/query rows (remote) | wrangler d1 execute ... --command "..." | Account → D1 → Edit |
That is enough. Edit includes reading and writing D1; you do not need a separate read permission. --local operations do not touch the Cloudflare API (they run against a local on-disk copy), so they do not consume token permissions.
Create the token
- Go to My Profile → API Tokens and choose Create Token → Create Custom Token.
- Under Permissions, add one row:
Account·D1·Edit. - Under Account Resources, select Include → your account (not “All accounts”).
- Optional but recommended: set a TTL (expiration date) and, if your network is fixed, restrict it with Client IP Address Filtering.
- Create the token and copy it once; Cloudflare will not show it again.
Use the token with Wrangler
Wrangler reads the token from the CLOUDFLARE_API_TOKEN environment variable. For D1 commands, it is also useful to set CLOUDFLARE_ACCOUNT_ID (visible in your account dashboard):
export CLOUDFLARE_API_TOKEN="your-token-scoped-to-D1-Edit"export CLOUDFLARE_ACCOUNT_ID="your-account-id"
npx wrangler d1 create viewsnpx wrangler d1 execute views --remote --file=./schema.sqlReferences
- Cloudflare. (2026). D1: Cloudflare’s native serverless SQL database. Cloudflare Docs. https://developers.cloudflare.com/d1/
- Cloudflare. (2026). D1 Workers Binding API (prepare, bind, run, first). Cloudflare Docs. https://developers.cloudflare.com/d1/worker-api/
- Cloudflare. (2026). Wrangler commands: d1 create / d1 execute. Cloudflare Docs. https://developers.cloudflare.com/workers/wrangler/commands/#d1
- Cloudflare. (2026). Create API token and token permissions. Cloudflare Docs. https://developers.cloudflare.com/fundamentals/api/get-started/create-token/
- Cloudflare. (2026). Pricing: Workers & D1 free tier limits. Cloudflare Docs. https://developers.cloudflare.com/d1/platform/pricing/
- Astro. (2026). Cloudflare adapter (@astrojs/cloudflare): accessing the runtime. Astro Docs. https://docs.astro.build/en/guides/integrations-guide/cloudflare/
- Astro. (2026). Endpoints and on-demand rendering (prerender). Astro Docs. https://docs.astro.build/en/guides/endpoints/
- SvelteKit. (2026). adapter-cloudflare and platform.env bindings. Svelte Docs. https://svelte.dev/docs/kit/adapter-cloudflare
- SvelteKit. (2026). Server routes (+server.js). Svelte Docs. https://svelte.dev/docs/kit/routing#server
- SQLite. (2026). UPSERT (ON CONFLICT … DO UPDATE). SQLite Documentation. https://www.sqlite.org/lang_upsert.html